- Login Account
- [Account Management Page] - A login account is required to connect to the public loginserver as well as registering a server to use the public loginserver
- Database Server
- MariaDB is preferred and what we use
- Database Management Tool
- HeidiSQL is free and what some of us use
*** SVN Access ***
- username anonymous
- no password
Setting up the folder structure
Create a folder in the root of your drive c: named EQ2.
Inside the EQ2 folder create a folder named Source. Go ahead and create another folder named Server as well. Additionally you should create another folder called EQ2client (where the backup copy of your client should go).
Batch file to create folder structure. This will create a folder structure in the C dirve. it is only a folder sturcture and nothing else.
Getting the source
In order to download the source a GUI subversion client such as TortoiseSVN is recommended to retrieve the source code. TortoiseSVN will be used in this guide.
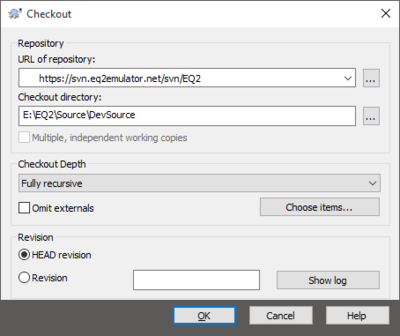
Once TortoiseSVN is installed right click on your newly created Source folder and choose SVN Checkout. The following URL is required in the window that pops up. Enter it in the URL of repository.
https://svn.eq2emulator.net/svn/eq2server
Also make sure the Checkout Directory is the directory you want to download the source to (C:\EQ2\Source). It should look similar to this image.
If this is your first visit to the SVN, you will be greeted by a Certificate validation failed popup. You will have to validate the certificate before you can proceed. Choose either the Accept the certificate or the Accept the certificate permanently. The latter option will not prompt you again to validate the certificate.
This is safe as long as the certificate is from MMO, MMOE, Phoenix, AZ, US.

Once you are past that...
It's time to enter the login credentials.
SVN Access Username: anonymous (no password required)
Sit back and let the source code download.
Compiling the source
This guide is going to be using Visual Studio 2017 Community Edition.
- Open EQ2WorldVC10.sln in the win folder and run through the conversion wizard.
- In Visual Studio 2010, 2012, or 2013 right click the project and select properties
- Under the VC++ Directories: ensure the following are included (should be configured already) (the same x64 equivalents if compiling x64)
- Include directories
- $(SolutionDir)..\source\depends\mariadb-10.1.19\include;
- $(SolutionDir)..\source\depends\zlib\include
- Library directories
- $(SolutionDir)..\source\depends\mariadb-10.1.19\lib;
- $(SolutionDir)..\source\depends\zlib\lib
- Choose Debug or Release and the architecture you want to build for 32 or 64
- Compile and continue for setting up your Server folder.
Setting up the Server folder
Remember that Server folder you created way back at the beginning of this guide? Now we are going to use it.
Once you have navigated to your Server folder, create a new folder "worldserver" inside the Server folder. If you plan on using the minilogin (local login server) create another folder "loginserver" there as well.
We will need to move our compiled binaries over along with some other files. Let's go ahead and open our worldserver folder. To make things easier, open up a new window and navigate to C:\EQ2\Source\trunk\bin. Depending on the architecture you choose to build for will be the file you need to move to your worldserver folder. If you built for a 32-bit system then you will want to move EQ2World.exe. If you built for a 64-bit system then you will want to move EQ2World_x64.exe. Go ahead and move the file over to your worldserver folder now.
Head over to the structs folder located in C:\EQ2\Source\trunk\structs. We need to copy (not move) these files to our worldserver folder also.
- CommonStructs.xml
- ItemStructs.xml
- SpawnStructs.xml
- WorldStructs.xml
Time to copy config files to the worldserver folder. Locate the config files in C:\EQ2\Source\trunk\configs. There should be three files located there.
- log_config.xml
- LoginServer.ini
- world_db.ini
Move all three of these to the worldserver folder. Your world.exe will not work without them.
Before moving on, you should make one more folder inside your worldserver folder named Maps. This is for level geometry maps and is in development.
Register Your Server
You need to register your server for the public login server to recognize it, providing you want to use the public login server.
In order to register your server you need a Login Account.
- 2. Complete the Login Account Registration and verify that your account was created successfully.
Note: Password is case sensitive and must contain one number
Once a login account is set up, login at the Account Management Page and navigate to the My Servers tab
Complete the form to register your game server with the public Login Server (You will need to provide the Login Account information from step 2 as well).
- 1 Login Account Name - This is your Login Account Name that you created previously.
- 2 Login Account Password - This is your Login Account Password that you created previously.
- 3 World Account Name - Account name that will be used by the server to login.
- 4 World Account Password - Password that will be used by the server to login.
- 5 Verify Password - Verify the password in 3.4 is correct - type it again
- 6 World Server Name - Name used to identify your server.
- 7 World Description - Brief description describing your world.
Database Server
Install latest MariaDB. If you are experienced with mysql you may run the commands directly instead of following the GUI setup (HeidiSQL).
Alternatively you can use MySQL. Any MySQL distribution at, or above, 5.0.27 should work fine. Visit MySQL archive to find 5.0.27 and above.
Download and install HeidiSQL, SQLYog or any MySQL (official) GUI Tools. This guide uses HeidiSQL. Interpret this for your own GUI if you do not use HeidiSQL.
- Once it is installed, connect to MySQL with username: root and the password for root. I think default is no password.
- Create a database by clicking Tools, Create Database.
- Enter a name for the database. I used eq2world as the name of the database that will house my world content.
It's wise to create a user to access the database besides root. Also you need to set a password for root if you have not already done so.
- Click on Tools, User-Manager and under credentials enter a username and password that you would like to use for your server. If you will be accessing the database from multiple computers then leave it %. Otherwise set it to either your computer's IP address or localhost.
- Click on the "All Privileges" checkbox and in the "Allow access to:" box, click on the eq2world database. Then click create.
- While in the User-Manager go ahead and change the password for root.
Configuring the server
Time to configure your server to use your database and loginserver.
Set up you world_db.ini to connect you server with a database.
- Open world_db.ini
- Edit the information in this file to match your host (localhost if it is being run from the same machine you are using), your MySQL username and password you created in HeidiSQL, and the name of the database (eq2world).
Save and close out of world_db.ini
Configure the LoginServer.ini to point your server at the public login server provided by Eq2emulator.net.
- Open LoginServer.ini
- Replace WORLD_NAME_HERE with the World Server Name you created in My Servers tab of the Account Management page.
- Replace EXTERNAL_IP_HERE with either localhost if you want to only allow yourself to login, or replace it with your external ip address. You can get this by browsing to http://www.whatismyip.com
- Add the username and password you used to register your server with in the My Servers tab of the Account Management page.
- Set, or check, the update server part of the ini.
- [UpdateServer]
- updateserveraddress=updates.eq2emulator.net
- updateserverport=9104
Save and close out of LoginServer.ini
Visit the minilogin page if you plan to use a local login server.
If you would like to know more about the config files, visit the log_config.ini page or the LoginServer.ini page.
Patching the database
We provide a database patching system that creates and updates the database your server needs to operate.
For those that use the patcher for the first time, ie your blank database you created earlier, this will create all the required tables world.exe will need to run. It also adds the data needed that allows players to connect their clients to your server.
After the initial setup, the patcher system will update your database with core changes and add support for clients as it becomes available.
Take note that this system is not a content patching system. It is only to update core data if and when it is needed.
If you have been following this tutorial then you have already verified that the [UpdateServer] information has been filled in along with your server name, login, and password.
If you have not done so, it will need to be completed before moving on. DB Loginserver.ini page has details on setting it up to connect to the db patcher.
After the Loginserver.ini verification, launch your server by running EQ2World.exe (EQ2World_x64.exe) to start the patching process.
If everything went well you should now be able to login to your server using the public login.
If you get a MySQL error 2006 then max allow packets is set too low.
05:59:56 E Database: Error running MySQL queries from file 'eq2-updates.sql' (2006): MySQL server has gone away
05:59:56 I Patcher: Failed to update database
or you get
05:59:56 E Database: Error running MySQL queries from file 'eq2-updates.sql' (2013): Lost connection to MySQL server during query
You need to locate the my.cnf (my.ini) file in your MariaDB install. Default should be C:\Program Files\MariaDB 10\bin. Open the my.ini in your favorite text editor and find max_allowed_packet. Change the default value to 256M or higher. Restart the MySQL server and relaunch Eq2world.exe.
If the max_allowed_packet line doesn't exist then add it to the bottom of the [mysqld] section.
max_allowed_packet = 256M
Content
There are a couple of ways to add content to your server.
- 1. Use the official content of EQ2Emulator. Our database contains some older data dating back to pre DoV expansion (Note it is not everything pre DoV, but some), and up to at least CoE expansion. It's still being developed and needs cleaned up as well as scripts added.
- 2. You can create your own content from scratch. You will have to manually add, and design, everything from NPC's to Items. You cannot simply spawn a Freeport Guard and use that as a template, because your database is absolutely empty.
- 3. Best of both worlds option. Unless designing your own everything is your passion, then my suggestion is to use the EQ2Emulator content and customize to your hearts desire. This method let's you have a template of all NPC'S, objects, Harvest Nodes, etc that can be found throughout Norrath.
Getting Official Content
In your EQ2 directory you should have created a Content folder. If you didn't, do so now. Right click on the newly created Content folder and select SVN Checkout. It is the same process you used to get the source code, only this time we are going to get content instead. In the URL of repository enter this URL.
https://svn.eq2emulator.net/svn/eq2content
When the SVN repo has downloaded you should have a archives, release, and trunk folder. The one we are interested in is the trunk folder, so go ahead and enter that directory. You should now see the database and scripts folders.
Everything in the scripts folder needs to be copied to the directory that contains world.exe.
C:\EQ2\Server\worldserver This contains all the script files from quest to NPC conversation. You will need these.
The database directory contains... you guessed it, the database. Navigate to the dev_db directory and find the file with the following name.
EQ2DBProject_Current.tar.gz
That will be located in the trunk/database/
dumps/dev_db directory.
Unzip with 7zip, or similar program. This will give you a SQL file.
EQ2DBProject_Current.sql
You will need this to source the data into your database.
You can visit the SVN Page for source, content, and tools.
==
Original guide taken from EQ2Emu Forums posted by Razmalone
Origional Post Here
Updated here by theFoof 3/10/13
Updated again by Cynnar 1/10/18
Update is in progress
==
|

